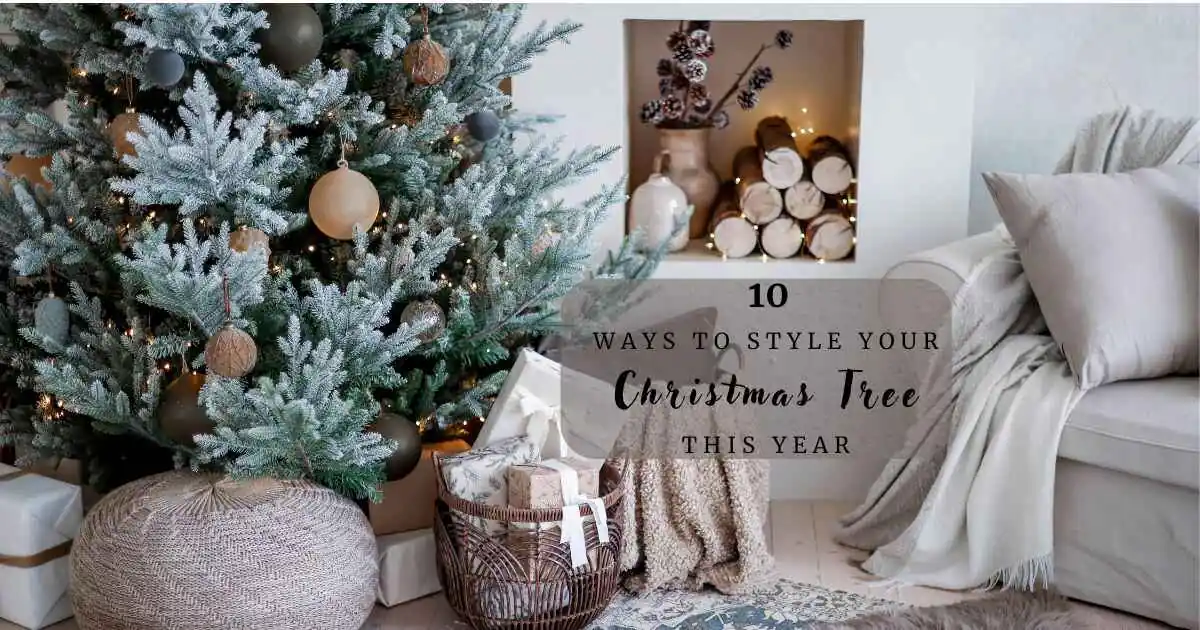
The Christmas tree is the centerpiece of holiday decorating. Whether your style is timeless and traditional or clean and contemporary, the right design turns your living space into a festive retreat and a welcoming space for holiday hosting and entertaining.
If you’ve ever wondered how designers create those magazine-worthy trees, this guide breaks it down into ten simple, professional techniques that will make your tree unforgettable.
1. Choose the Right Tree and Color Scheme
Before adding a single ornament, start with the foundation by selecting the right tree and color palette. The tree sets the tone for the entire room, so choose a size and shape that fits your space and ceiling height, and a style that complements the overall theme. There are so many styles of trees from which to choose. For a winter-wonderland look, try this 7.5ft Pre-lit White Flocked Christmas Tree.
Flocked trees work for all types of Christmas decorations and themes, from classy and elegant to playful and whimsical, making it easy to incorporate with your preferred style.
If you prefer something natural, this 7.5ft Pre-Lit Cascade Evergreen Slim Christmas Tree creates a cozy, organic feel.
This tree features 9 light settings, a slim design, and comes with a remote.
For a stunning, dramatic, well-lit tree, you can’t go wrong with this 7.5ft Pre-Lit Majestic Evergreen Fir Christmas Tree.
Designed with 3,261 individually crafted branch tips and 1,800 LED lights. Did I say 1,800 lights? Yes, I did. If you are a more-is-better when it comes to lights on your tree, this is your must-have. Bonus: it comes with a foot pedal and remote.
2025 Trending Color Palettes:
Here you go — each point in an ordered list with the text before the colon in **strong** formatting:
- Dark Navy Blue and Copper: stunning and warm
- White and Silver: crisp and elegant
- Emerald and Burgundy: rich and dramatic
- Natural Green and Wood Accents: grounded and cozy
- Dark Plaid: sophisticated and timeless
Tip: Stick to two or three complementary colors for a pulled-together, designer look.
2. Layer the Lights
Lighting is what gives your tree depth and warmth. Plan for about 100 lights per foot of height if your tree isn’t pre-lit. Start near the trunk and weave outward in vertical sections for even coverage.
These are my favorite lights for my trees.
This set includes 500 warm white LED lights with 13 lighting modes, memory settings, and a timer function. I have been impressed with the quality and have purchased multiple sets this year.
Mixing lighting types creates dimension and interest. Use warm white string lights as a base, then accent with 100-count mini lights for a soft, glowing effect throughout the branches. For a 7.5ft, large-width tree, I used two sets of the 500-count lights and 4 of the mini light sets.
Add Garland or Ribbon for Texture
Garland and ribbon add fullness and flow. For ribbon, begin at the top and drape downward in loose loops, tucking sections into branches (you may want to use floral wire to secure each section) for a natural cascade. Garland looks gorgeous, doubled up in elegant swoops by draping garland in graceful curves between mounting points.
For a refined touch, try this crystal glass ball garland.
Its faceting reflects light beautifully. I have this garland as well as tiny ornaments in the same style mixed into my tree this year.
If you prefer ribbon, choose wired fabric and let it curve gently rather than wrapping tightly. Velvet ribbon complements most Christmas themes and can be used in numerous places throughout your home. I have found this velvet-wired 2.5-inch ribbon to be of great quality and easy to work with.
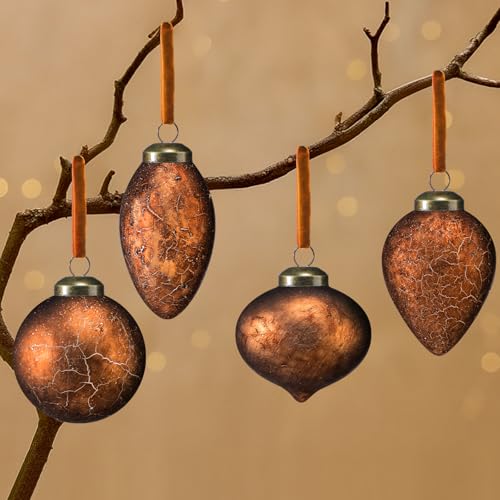
4. Balance Ornament Placement
Balanced ornament placement makes any tree look professionally designed. Group ornaments in three sizes: large (anchors), medium (fillers), and small (accents).
Start with large ornaments deeper in the branches, add medium pieces around them, and finish with smaller ones on the outer tips. Mix finishes, such as matte, glossy, and metallic to reflect light beautifully.
Here are a couple of the sets I purchased this year and would purchase again. In fact, I did purchase more of the first set.
5. Add Meaningful Ornaments
A cohesive tree doesn’t have to feel impersonal. Include ornaments that tell your story: family heirlooms, handmade pieces, or travel mementos. Place these at eye level where they’ll be noticed and spark conversation. These bring warmth and personality that no store-bought set can match.
If you don’t want to mix these with your other curated pieces, consider designing another tree that has only your sentimental ornaments and place it in another room in your home. Or, if you’re like me, design 5 or 6 trees throughout your home. Do whatever makes you happy.
6. Mix Textures for Depth
Designers rarely rely on a single finish. Combining materials creates a rich, layered look. Mix smooth glass with rustic wood, glitter with velvet, and metallics with natural pinecones.
The contrast keeps the design dynamic and visually interesting.
7. Choose the Right Tree Topper
The topper draws the eye upward and completes the design. Select a piece that complements your color scheme and tree height.
Options that feel timeless include:
- Stars: simple and classic
- Angels: graceful and traditional
- Oversized Bows: modern and dramatic
- Ornament Clusters: creative and bold
- Picks and Sprays: adds height and dimension
A seven-foot tree generally fits a 12- to 15-inch topper.
8. Fill Gaps with Picks and Stems
Decorative picks and stems are professional decorators’ secrets. They fill bare spots and add shape, texture, and interest.
Choose frosted branches, berry sprays, metallic stems, or natural elements like pinecones and tuck them between ornaments to add fullness.
9. Style the Base
The base is often overlooked but completes the design. Wrap gifts in coordinating paper to carry your palette downward and use a tree skirt or collar that matches your aesthetic. Add decorative accents like lanterns or bowls filled with ornaments to create a cohesive, styled look. I often use blankets around the base of the tree. For smaller or tabletop trees, I often use clay pots, brass planters, and baskets, and set the tree right inside. This gives a unique and collected look.
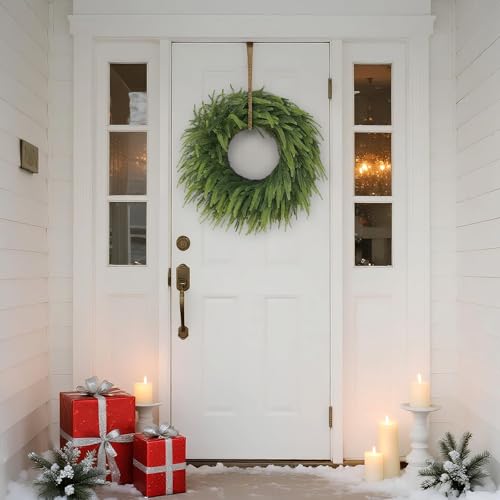
10. Create a Cohesive Holiday Scene
Once the tree is finished, extend the look throughout the room and consider extending it throughout the home. Use matching greenery on mantels, staircases, or entryways for visual flow. I personally don’t suggest mixing flocked with green, but that’s just my preference.
Hang a wreath or garland near your tree and coordinate table settings with complementary colors and textures. Here are a couple of options for wreaths to consider.
Explore more ideas and products in the Christmas Collection.
Styling a Christmas tree is about more than decoration; it’s about creating a gathering place that reflects your personality and traditions and allows your family and friends to feel welcomed, comfortable, and joyful.
Start with a thoughtful color palette, layer lighting for dimension, balance ornament sizes, and mix textures for depth. With a few curated pieces and meaningful accents, your tree will feel beautifully designed and completely personal.